We get it:
Nothing’s better than sitting back with your friends, rolling a joint, and getting baked.
We’ve created this step by step tutorial to teach you exactly how to roll a joint, so you can get it right every time.

I’m your joint rolling jedi master, and you’re my young padawan.
In other words, I’m going to teach you how to roll a perfect cone joint.
This guide is geared for beginners. Follow our tips, and you’ll be a joint rolling pro in no time!
Rolling with Rogen
How to Roll a Joint in 5 Easy Steps
In this section of the guide, we’re going to walk you through the joint rolling process, step by step.
- Grind your weed
- Make a filter
- Lay your ground weed in the joint
- Tuck the paper underneath the filter
- Lick the glue, roll, and seal!
Our rolling technique is a bit different from Seth Rogen’s technique. You can watch the video and follow our guide to see which method you prefer, and which one is easier for you.
This is how I learned how to roll, and now I can roll fat doinks with ease.
Without further ado, let’s get started!
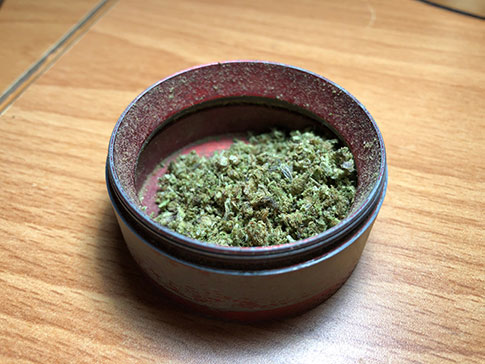
Step 1: Grind Your Weed
If you want to roll a perfect joint, you have to use ground up weed.
Sure, you could just break up the weed with your fingers, but that’s not the move.
Here’s why:
Joint papers are thin, and they burn quickly. If the weed in your joint isn’t ground up finely, the joint won’t burn evenly because the paper will burn faster than the weed.
You want your weed to burn at the same speed as the paper.
Here’s what my weed looks like after I’ve ground it up:
If you don’t have a grinder or you’re interested in buying a new one, we’d recommend Golden Gate Grinders.
They do an incredible job and they last a lifetime.
Anyway, on to the next step.
Step 2: Make the Filter
You’re going to need a filter before you start rolling a joint.
Most packs of RAW joint papers come with small cardboard filter strips that can be rolled into a filter tip.
Toker Tip
If you don't want to make a filter every time, you can buy pre-rolled filter tips.
In fact, I like to use pre-rolled filter tips in my joints.
They're always perfectly round, they're easy to use, and they're convenient.
If you’re interested in pre-rolled filter tips, we recommend using RAW filter tips.
Once you have your filter paper ready, begin folding it up like an accordian.
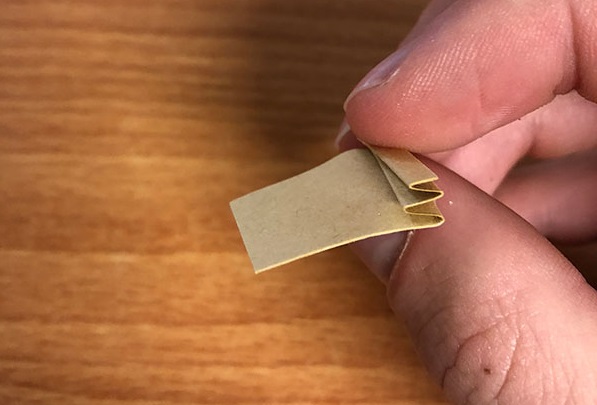
This is what your filter should start to look like as you begin folding
After a few folds, you can then wrap the remaining filter paper around the folds, ultimately creating a nice filter tip for your joint:
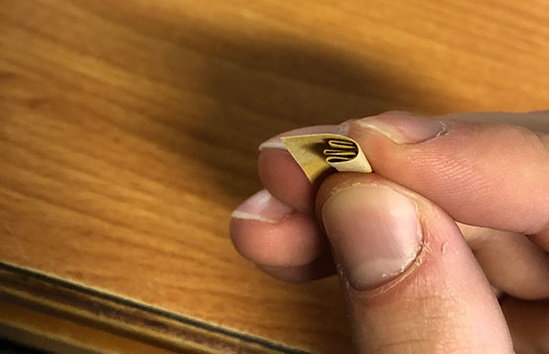
When you have enough paper left to wrap around the folded portion, begin wrapping it up. Afterwards, you should have a nice filter made, ready for your joint.
Now that your filter is ready, it’s time to select your joint paper.
I decided to use a RAW king size joint paper for this tutorial, but you can use any kind of paper you want.
Next, hold the paper with the glue side (the shiny strip on one of the paper’s edges) opposite from you, and place your filter at the end of the paper, flush with the edge.
I am right handed, so I put the filter on the left side of the joint.
I don’t think it matters which side you choose, as long as it’s flush with the edge of the paper. Try both sides to see which is more comfortable for you.
It’s very important that your filter tip is flush with the edge of the jont.
If your filter tip isn’t flush with the edge, it’ll cause problems later on down the line.
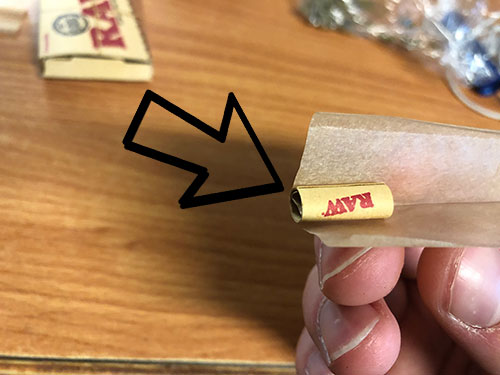
In this image, I’m using a RAW pre-rolled filter. Notice how the filter is lined up perfectly with the edge of the joint paper.
Now that your filter has been made and placed properly, it’s time to add your kush!
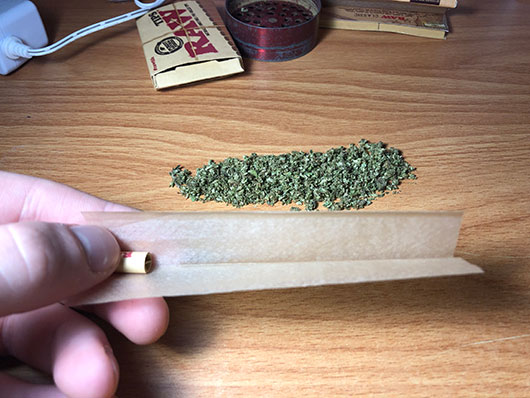
Step 3: Lay Your Ground Weed in the Joint
Take your joint paper and filter in your non-dominant hand, and place your weed in the paper like so:
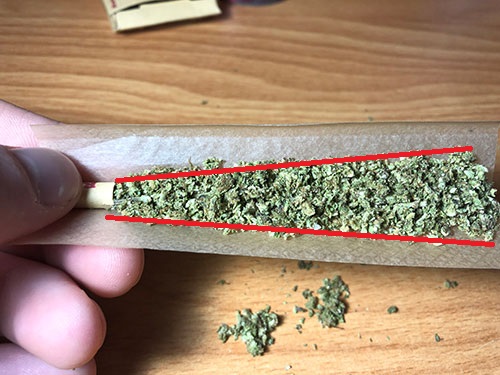
Take a look at the distribution of the weed. Notice how there is less weed by the filter, and increasingly more weed towards the opposite end of the joint paper. This will help to create a cone shape when we roll the joint.
Unlike rolling a blunt, which requires you to lay your weed evenly across the wrap, when you’re rolling a joint you should distribute the weed unevenly – this helps you form a cone when you’re rolling.
In our general how to roll guide, I recommended grabbing a poker before you get rolling.
Sometimes weed can stick to your fingers, which is annoying when you’re trying to roll.
Furthermore, a poker (in this case, I was using a mechanical pencil) is a great way to move your weed around if you have big fingers.
It’s not necessary, but I find it useful to have some sort of pencil laying around.

I’m using a mechanical pencil to press the weed down in the joint, flat to the bottom. This will make it easier to tuck the paper when you’re ready to roll later on.
If you want, you can roll the joint back and forth between your fingers to get the weed to lay flat in the joint.
However, I found it easier to use a pencil when I first learned how to roll. This part is totally up to you.
Toker Tip
Seriously,
make sure your weed is laying flat in the paper, compacted down to the bottom, either with a pencil or by rolling the paper back and forth between your fingers.
If the weed isn't positioned properly, you're going to screw yourself when it comes time to tuck the paper.
Remember:
The secret to a great joint is the tuck. It's all about the tuck, baby!
Now that your weed is sitting properly in the joint paper and your filter is flush with the edge of the joint, it’s time to begin the actual rolling process.
Step 4: Tuck the Paper Underneath the Filter
This is step is, unfortunately, both the most important and the hardest. If you mess this up, your joint will be fucked.
No pressure.
With the hand holding the filter side of the joint, begin to tuck the joint paper tightly against the filter.
When I’m tucking the paper underneath the filter, I like to roll the filter and paper back and forth in my hand until I have the paper in the right position.
You can think of the rolling motion as if you took your thumb, pressed it against your pointer finger, and moved it up and down, almost like you were making the hand motion for money.
Do the same thing with the joint in your hand, and the paper will move nicely along the filter, until you tuck it snugly in place.
Make sure the paper is tight to the filter. This will make it much easier to roll the rest of the joint, and it will prevent your filter from falling out while you’re smoking.
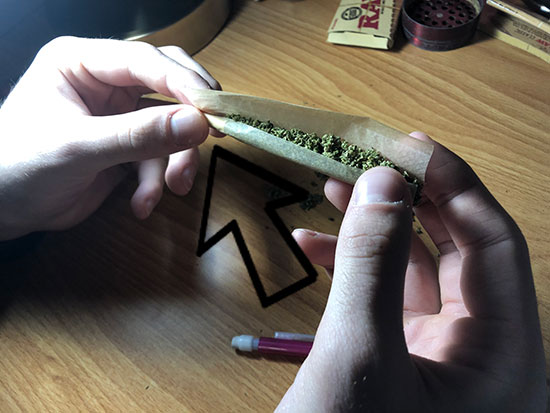
Next, use your thumb to hold the filter and paper in place as you begin to roll the rest of the joint over the weed in the paper.
Since the weed is already laying flat in the joint and it is arranged properly, it should be easy for you to roll the lip of the paper over the weed.

Once you have the paper tucked underneath the filter, and the rest of the paper rolled over the weed, you should only have the strip of glue exposed.
Now you’re ready for the last step!
Step 5: Lick the Glue, Roll, and Seal!
Okay, maybe that’s three steps, but they pretty much happen at the same time… give me a break.
Anyway, take your joint with the glue strip exposed. Lick the glue strip like you’re licking an envelope, but don’t slobber on the paper.
Remember, joint papers are thin. If you slobber on it like a dog, your joint will be ruined.
You only need a little bit of saliva to activate the glue.
Once the glue has been lightly coated with saliva, simply roll the joint the rest of the way.
When the glue makes contact with the paper, run your thumb along the joint to seal it.
Watch Out
If any parts of the joint aren't sealed, try to lick the glue again and reseal it.
The bests joints are rolled all at once after the glue has been licked.
Practice rolling the joint up without the glue before you attempt it with the glue.
When the joint is sealed, the side opposite of the filter will be open.
Take any weed that fell out of the joint while you were rolling (or any extra weed you have) and fill the joint until there’s only a bit of paper left.
Pinch and roll the end of the joint to make the hat.
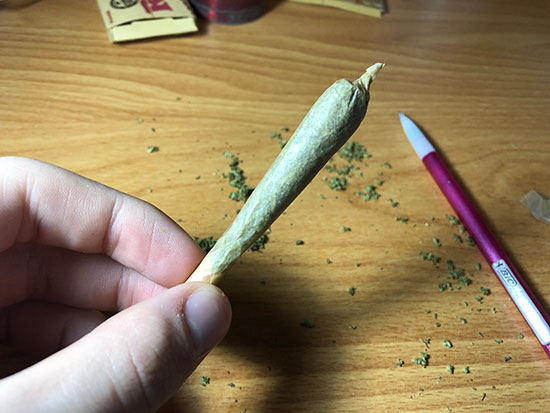
And voila! You have a perfect joint, ready to be enjoyed by you and your buddies.
Conclusion
For a long time, I would just smoke the joints that my friends rolled for me.
Then, everything changed.
I decided I wanted to learn how to roll a joint myself – no longer would I dependent on anyone else when I wanted to smoke a doobie.
Here’s the thing:
Rolling – at least, rolling well – takes some time.
You’re going to have to try it a few times, and maybe another time after that.
But hey, look on the bright side:
At least you’ll get to smoke all of them!
Stoner Story
Towards the end of my senior year of high school, I started learning how to roll.
By the time summer rolled around, I could roll a pretty big doobie in a few minutes.
Naturally, on the evening of graduation, I decided to roll a joint.
I went to my friend's house because his mother wasn't supposed to be home.
I made a fire in their firepit, sparked the joint, got baked with my friends, and relaxed.
Next thing I know, my buddy's mom is standing in the doorway, looking right at me.
Up until this point, I thought she'd cut my balls off for smoking weed, especially on her property...
Next thing I know, she pulls out a joint of her own, sits down next to me, and starts smoking.
Go figure!
This guide was intended to teach beginners how to roll a joint.
I hope it’s helped you!